
1. setState() Object Syntax
The
Syntax:
1.1 Callback vs Object
Callback:
It is used while updating the state to a value, which is computed based on the previous state.
Object:
It is used while updating the state to a static value.
2. Sending Function as Callback
We can pass functions as props to child components.
Syntax:
3. Input Element
In React, the Input Element
- Controlled Input
- Uncontrolled Input
3.1 Controlled Input
If the Input Element
Example:
3.2 Uncontrolled Input
If the Input Element
Uncontrolled inputs are like traditional HTML form inputs. Its
Example:
4. Searchable Users List Application
File: src/App.js
Coding Practice 6
In this project, let's build a Random Number Generator by applying the concepts we have learned till now.
Refer to the image below:
Design Files
Click to view
Set Up Instructions
Click to view
- Download dependencies by running npm install
- Start up the app using npm start
Completion Instructions
Functionality to be added
The app must have the following functionalities
- Initially, the number displayed should be 0
- When Generate button is clicked, a random number should be generated in the range of 0 to 100 and displayed
Implementation Files
Use these files to complete the implementation:
- src/components/RandomNumberGenerator/index.js
- src/components/RandomNumberGenerator/index.css
Quick Tips
Click to view
You can use
Math.random()function to get a random number (float value) in range 0 to less than 1 (0 <= randomNumber < 1)You can use
Math.ceil()function to round a number up to the next largest integerJAVASCRIPTYou can use the
box-shadowCSS property to apply the box-shadow effect to containers
You can use the
cursorCSS property to specify the mouse cursor to be displayed when pointing over an element
You can use the below
outlineCSS property for buttons and input elements to remove the highlighting when the elements are clicked
Resources
Colors
Font-families
- Roboto
Things to Keep in Mind
- All components you implement should go in the
src/componentsdirectory.- Don't change the component folder names as those are the files being imported into the tests.
- Do not remove the pre-filled code
- Want to quickly review some of the concepts you’ve been learning? Take a look at the Cheat Sheets.
In this project, let's build a Destination Search app by applying the concepts we have learned till now.
Refer to the image below:
Design Files
Click to view
Set Up Instructions
Click to view
- Download dependencies by running npm install
- Start up the app using npm start
Completion Instructions
Functionality to be added
The app must have the following functionalities
- Initially, all destinations in the destinationsListshould be displayed
- When a value is provided in the search input, only the destinations whose names contain the value provided in the search input should be displayed irrespective of the case
The
DestinationSearchcomponent receives thedestinationsListas a prop. It consists of a list of destination objects with the following properties in each destination objectKey Data Type id Number name String imgUrl String
Components Structure

Implementation Files
Use these files to complete the implementation:
- src/components/DestinationSearch/index.js
- src/components/DestinationSearch/index.css
- src/components/DestinationItem/index.js
- src/components/DestinationItem/index.css
Important Note
Click to view
The following instructions are required for the tests to pass
The search for the destination should be case insensitive. You can use the
toLowerCasemethod to convert a string into lower case letters.JAVASCRIPTEach
DestinationItemshould have an HTML image element withaltattribute value as the value of the key name indestinationsList
Resources
Image URLs
- https://assets.ccbp.in/frontend/react-js/destinations-search-icon-img.png alt should be search icon
Colors
Font-families
- Roboto
- Open Sans
Things to Keep in Mind
- All components you implement should go in the
src/componentsdirectory.- Don't change the component folder names as those are the files being imported into the tests.
- Do not remove the pre-filled code
- Want to quickly review some of the concepts you’ve been learning? Take a look at the Cheat Sheets.
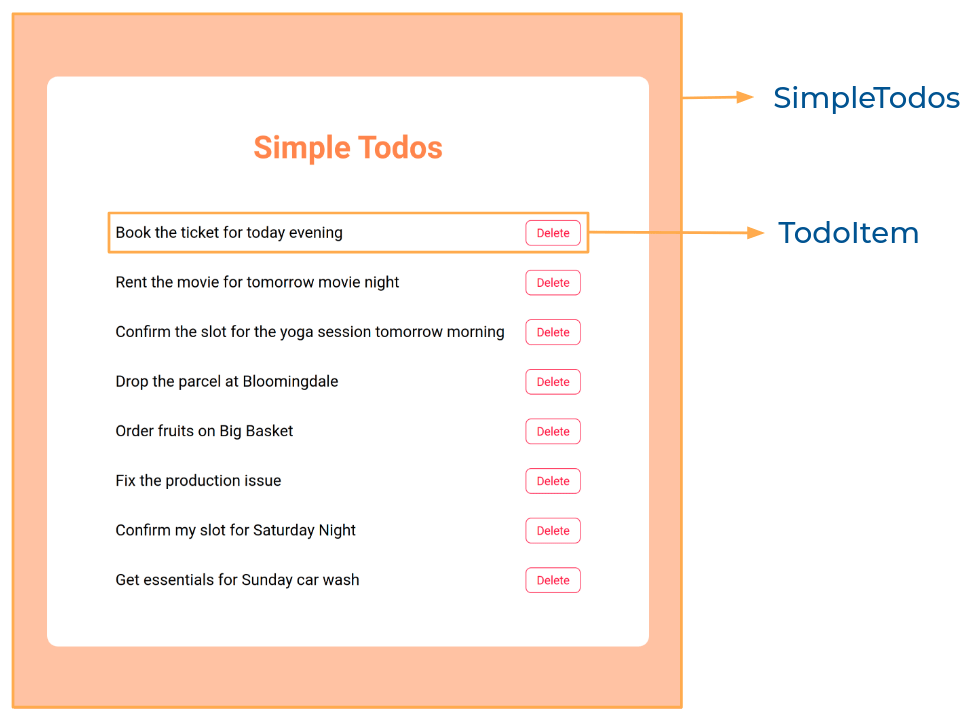
In this project, let's build a Simple Todos app by applying the concepts we have learned till now.
Refer to the image below:
Design Files
Click to view
Set Up Instructions
Click to view
- Download dependencies by running npm install
- Start up the app using npm start
Completion Instructions
Functionality to be added
The app must have the following functionalities
- Initially, the list of given todos should be displayed with a delete button for each todo
- When Delete button of a todo is clicked, then the respective todo should be deleted
The
SimpleTodoswill consist of theinitialTodosList. It consists of a list of todo objects with the following properties in each todo objectKey Data Type id Number title String
Components Structure
Implementation Files
Use these files to complete the implementation:
- src/components/SimpleTodo/index.js
- src/components/SimpleTodo/index.css
- src/components/TodoItem/index.js
- src/components/TodoItem/index.css
Quick Tips
Click to view
You can use the
cursorCSS property to specify the mouse cursor to be displayed when pointing over an elementYou can use the below
outlineCSS property for buttons and input elements to remove the highlighting when the elements are clicked
Resources
Colors
Font-families
- Roboto
Things to Keep in Mind
- All components you implement should go in the
src/componentsdirectory.- Don't change the component folder names as those are the files being imported into the tests.
- Do not remove the pre-filled code
- Want to quickly review some of the concepts you’ve been learning? Take a look at the Cheat Sheets.
....