1. Components
There are two ways to write React Components.
They are:
- Functional Components
- Class Components
1.1 Functional Components
These are JavaScript functions that take props as a parameter if necessary and return react element (JSX).
1.2 Class Components
These components are built using an ES6 class.
To define a React Class Component,
- Create an ES6 class that extends React.Component.
- Add a single empty method to it called render().
1.2.1 extends
The
1.2.2 render()
The
Syntax:
Use
2. React Events
Handling events with React elements is very similar to handling events on DOM elements. There are some syntax differences:
- React events are named using camelCase, rather than lowercase.
Example:
| HTML | JSX |
|---|---|
| onclick | onClick |
| onblur | onBlur |
| onchange | onChange |
- With JSX, you pass a function as the event handler rather than a string.
Example:
We should not call the function when we add an event in JSX.
In the above function, the
In the above function, the
Providing Arrow Functions
To not change the context of
3. State
The state is a JS object in which we store the component's data that changes over time.
When the state object changes, the component re-renders.
Intialising State:
3.1 Updating State
We can update the state by using
Providing Function as an Argument:
Syntax:
Here the previous state is sent as a parameter to the callback function.
3.2 State Updates are Merged
State updates are merged. It means that when you update only one key-value pair in the state object, it will not affect the other key-value pairs in the state object.
3.3 Functional Components vs Class Components
| Functional Components | Class Components |
|---|---|
| Renders the UI based on props | Renders the UI based on props and state |
Use Class Components whenever the state is required. Otherwise, use the Functional components.
4. Counter Application
File: src/App.js
File: src/components/Counter/index.js
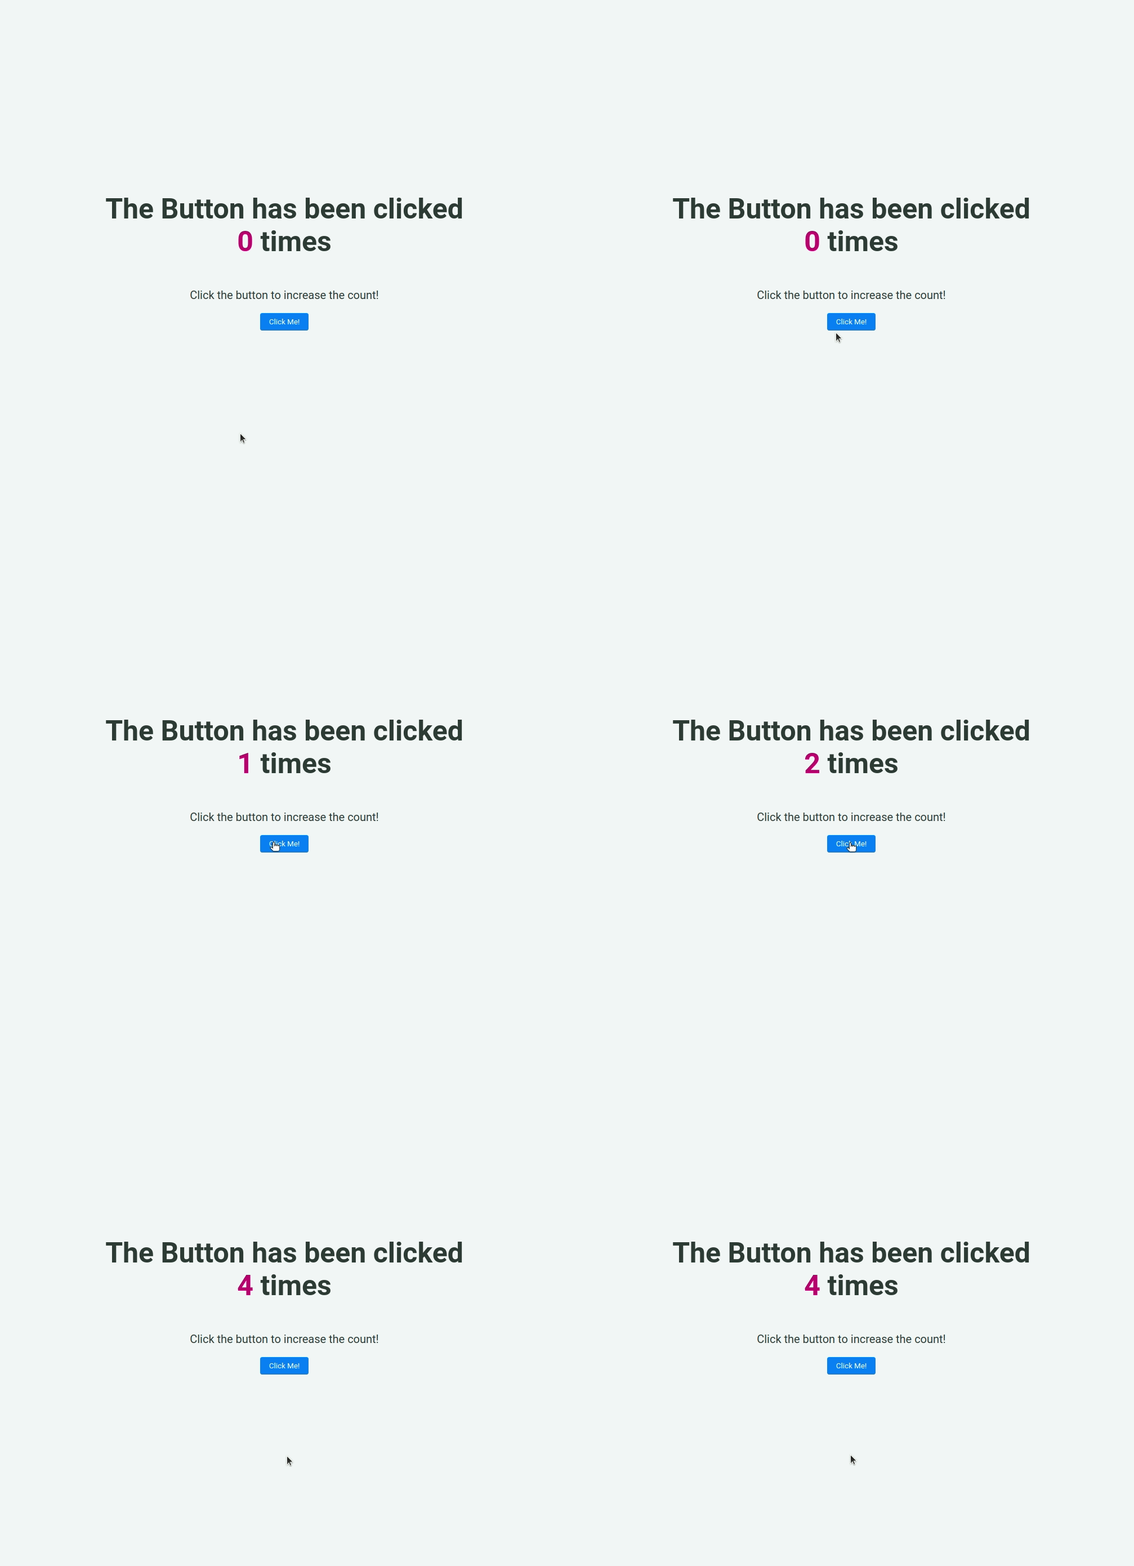
In this project, let's build a Click Counter by applying the concepts we have learned till now.
Refer to the image below:

Design Files
Click to view
Set Up Instructions
Click to view
- Download dependencies by running npm install
- Start up the app using npm start
Completion Instructions
Functionality to be added
The app must have the following functionalities
- Initially the count of the number of clicks should be 0
- When Click Me! button is clicked the count of the number of clicks should be incremented by 1
Implementation Files
Use these files to complete the implementation:
- src/components/ClickCounter/index.js
- src/components/ClickCounter/index.css
Quick Tips
Click to view
You can use the below cursor CSS property for buttons to set the type of mouse cursor, to show when the mouse pointer is over an element,

You can use the below outline CSS property for buttons and input elements to remove the highlighting when the elements are clicked,
Resources
Colors
Font-families
- Roboto
Things to Keep in Mind
- All components you implement should go in the
src/componentsdirectory.- Don't change the component folder names as those are the files being imported into the tests.
- Do not remove the pre-filled code
- Want to quickly review some of the concepts you’ve been learning? Take a look at the Cheat Sheets.
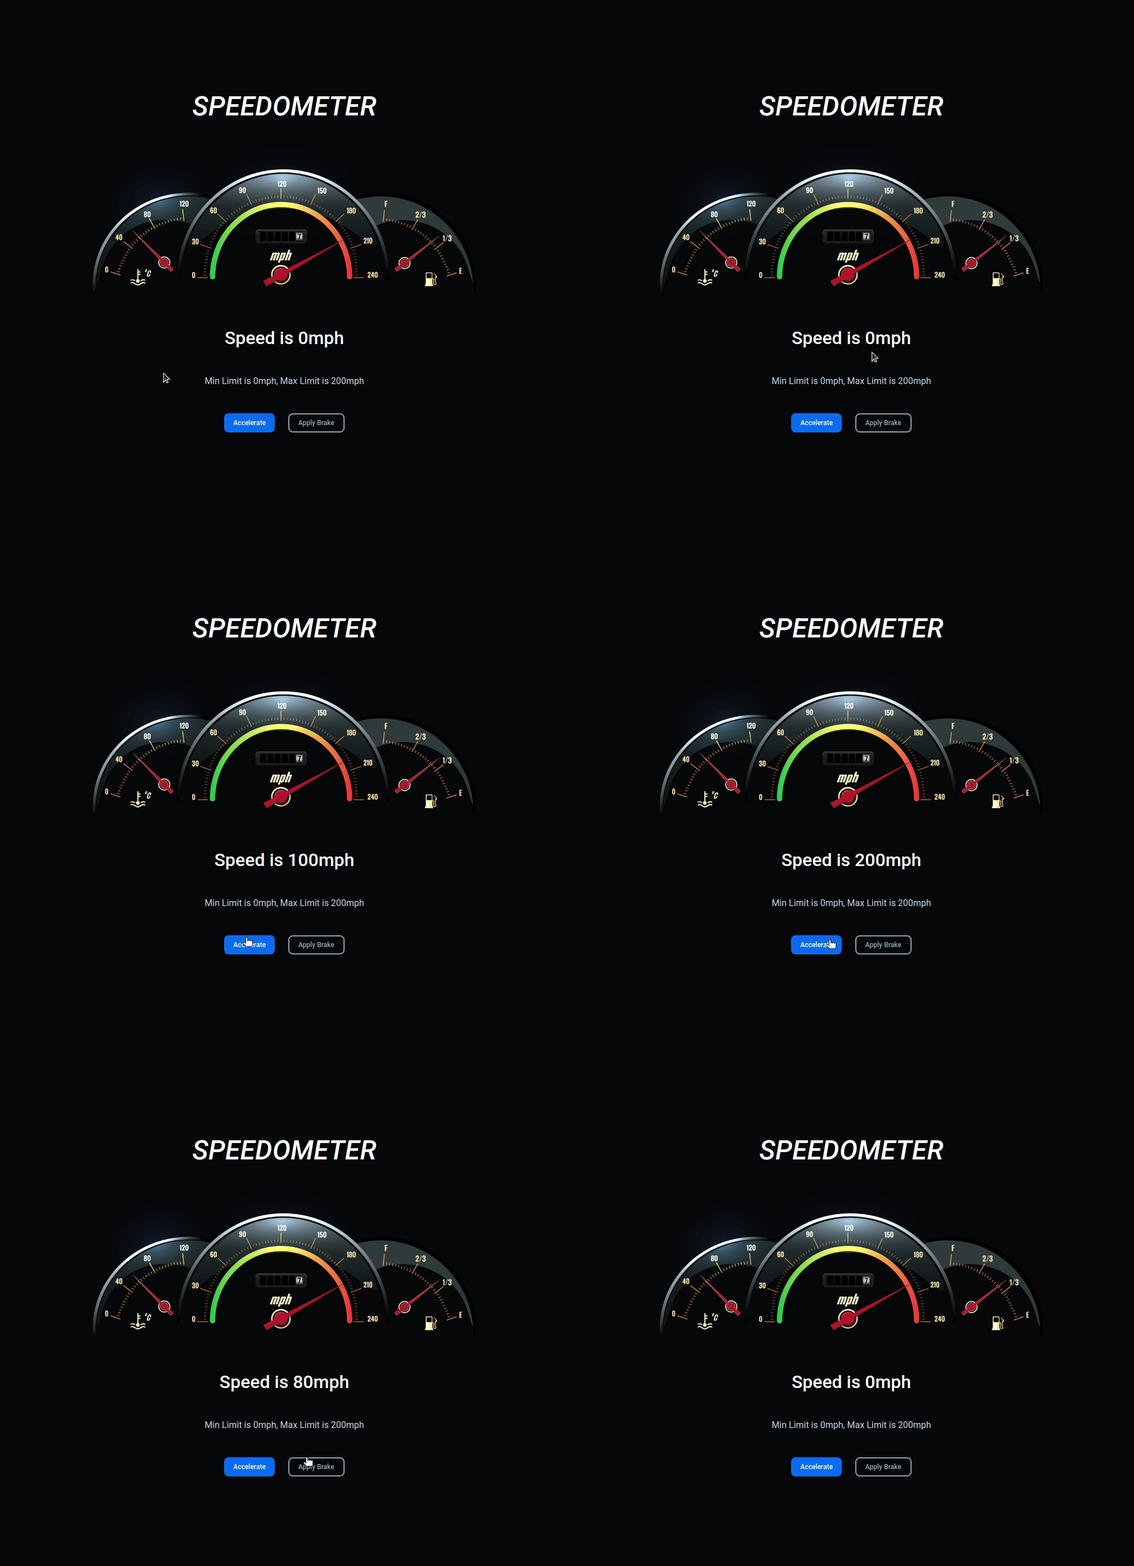
In this project, let's build a Speedometer by applying the concepts we have learned till now.
Refer to the image below:

Design Files
Click to view
Set Up Instructions
Click to view
- Download dependencies by running npm install
- Start up the app using npm start
Completion Instructions
Functionality to be added
The app must have the following functionalities
The speed should initially be 0mph
Here mph means Miles per hour
- When Accelerate button is clicked,
- If the speed is less than 200mph, the speed should be increased by 10mph
- If the speed is equal to 200mph, the speed should not be increased
- When Apply Brake button is clicked
- If the speed is greater than 0mph, then the speed should be decreased by 10mph
- If the speed is equal to 0mph, the speed should not be decreased
Implementation Files
Use these files to complete the implementation:
- src/components/Speedometer/index.js
- src/components/Speedometer/index.css
Quick Tips
Click to view
You can use the below cursor CSS property for buttons to set the type of mouse cursor, to show when the mouse pointer is over an element,

You can use the below outline CSS property for buttons and input elements to remove the highlighting when the elements are clicked,
Resources
Image URLs
- https://assets.ccbp.in/frontend/react-js/speedometer-img.png alt should be speedometer
Colors
Font-families
- Roboto
Things to Keep in Mind
- All components you implement should go in the
src/componentsdirectory.- Don't change the component folder names as those are the files being imported into the tests.
- Do not remove the pre-filled code
- Want to quickly review some of the concepts you’ve been learning? Take a look at the Cheat Sheets.
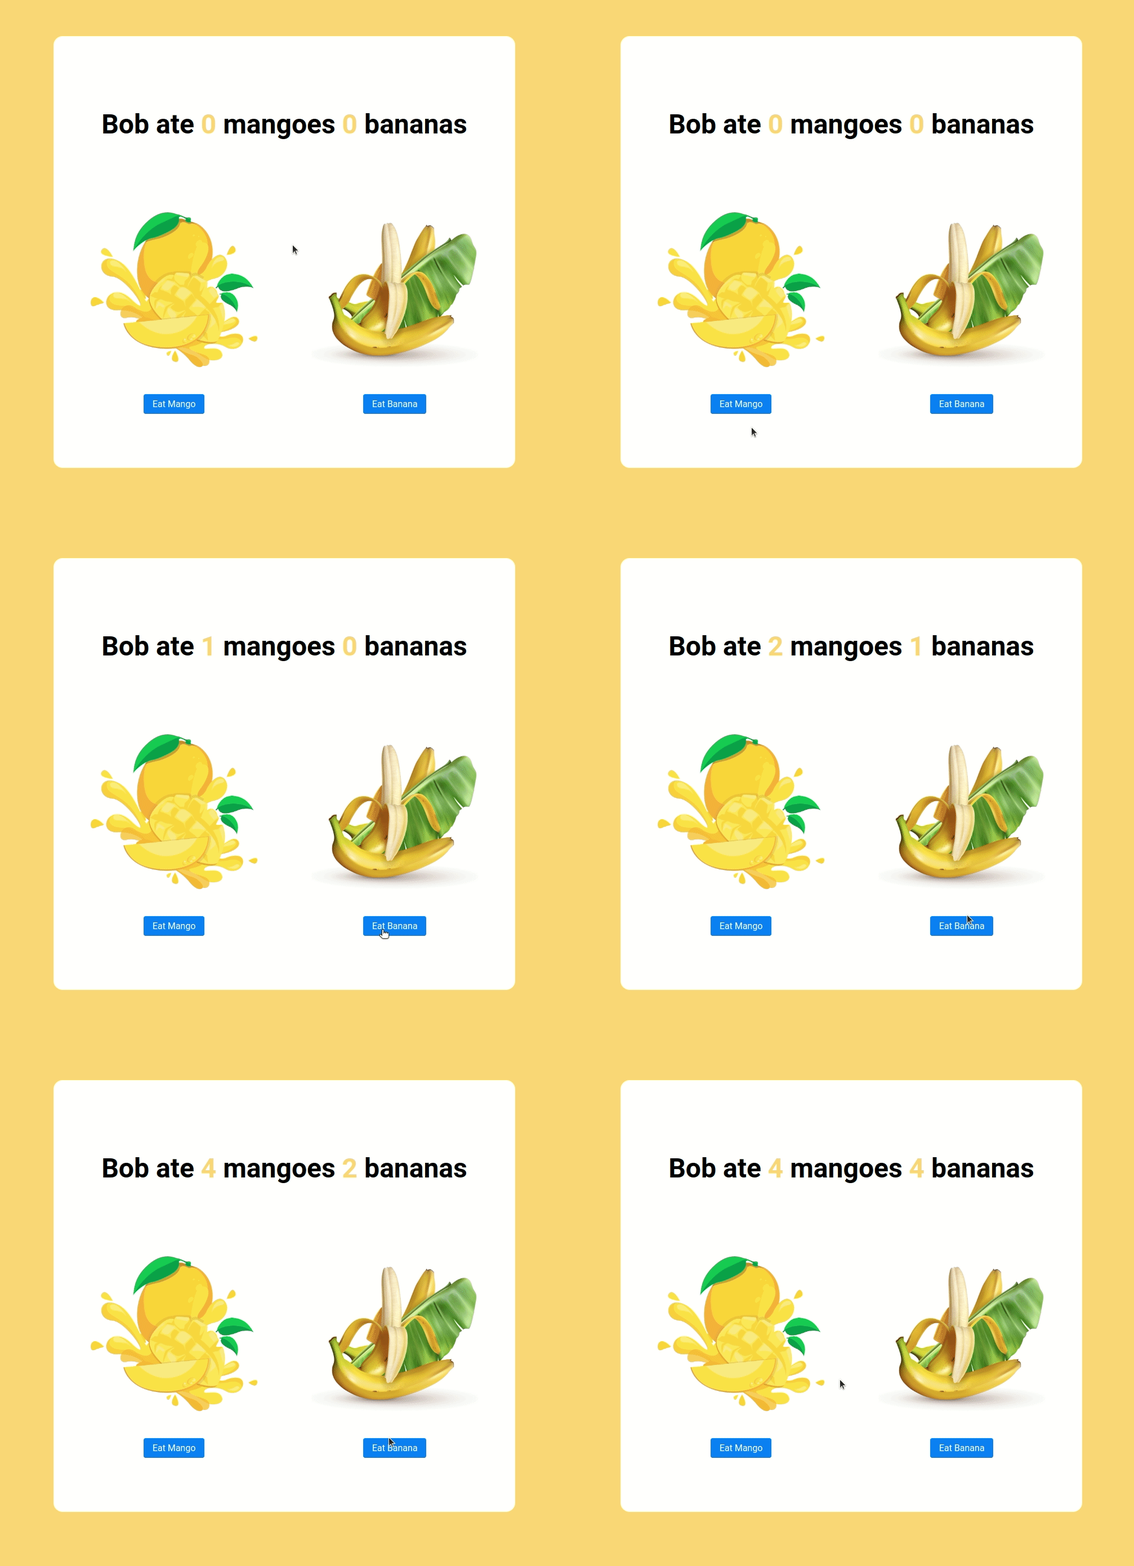
In this project, let's build a Fruits Counter by applying the concepts we have learned till now.
Refer to the image below:

Design Files
Click to view
Set Up Instructions
Click to view
- Download dependencies by running npm install
- Start up the app using npm start
Completion Instructions
Functionality to be added
The app must have the following functionalities
- Initially, the count of the eaten mangoes and bananas should be 0
- When Eat Mango is clicked the count of the mangoes eaten should be incremented by 1
- When Eat Banana is clicked the count of the bananas eaten should be incremented by 1
Implementation Files
Use these files to complete the implementation:
- src/components/FruitsCounter/index.js
- src/components/FruitsCounter/index.css
Quick Tips
Click to view
State updates are merged. It means that when you update only one key-value pair in the
stateobject, it will not affect the other key-value pairs in the state object.For example let's say your state is as followed:
If you use this.setState such as :
Your new state will be :
You can use the below cursor CSS property for buttons to set the type of mouse cursor, to show when the mouse pointer is over an element,

You can use the below outline CSS property for buttons and input elements to remove the highlighting when the elements are clicked,
Resources
Image URLs
- https://assets.ccbp.in/frontend/react-js/mango-img.png alt should be mango
- https://assets.ccbp.in/frontend/react-js/banana-img.png alt should be banana
Colors
Font-families
- Roboto
Things to Keep in Mind
- All components you implement should go in the
src/componentsdirectory.- Don't change the component folder names as those are the files being imported into the tests.
- Do not remove the pre-filled code
- Want to quickly review some of the concepts you’ve been learning? Take a look at the Cheat Sheets.
