1. Keys
The best way to pick a
Example:
File: src/App.js
The
1.1 Keys as Props
Keys don't get passed as a prop to the components.
If we need the same value in the component, pass it explicitly as a prop with a different name.
Example:
2. Users List Application
File: src/App.js
File: src/components/UserProfile/index.js
React Error - ENOSPC: System limit for the number of file watchers reached
Since create-react-app live-reloads and recompiles files on save, it needs to keep track of all project files.
To fix the error, run the below commands in the terminal:
Insert the new value into the system config
echo fs.inotify.max_user_watches=524288 | sudo tee -a /etc/sysctl.conf && sudo sysctl -pCheck that the new value was applied
cat /proc/sys/fs/inotify/max_user_watchesConfig variable name (not runnable)
fs.inotify.max_user_watches=524288
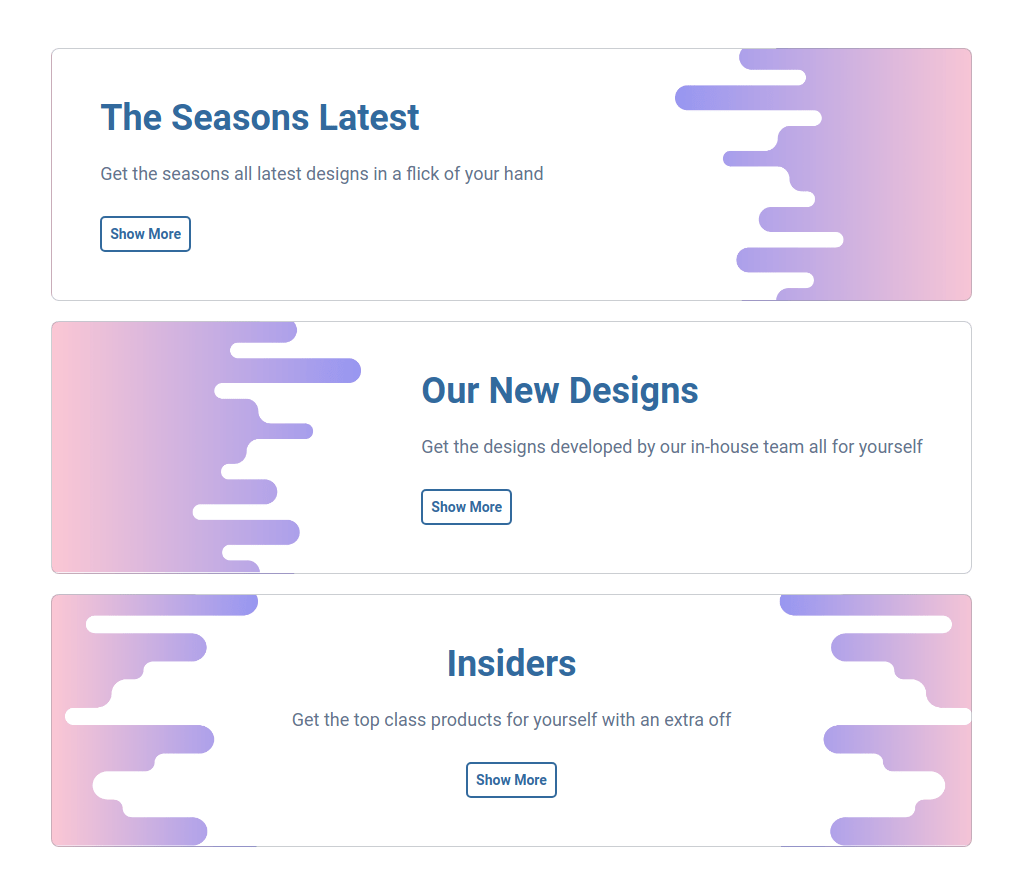
In this project, let's build Reusable Banners by applying the concepts we have learned till now.
Refer to the image below:

Design Files
Click to view
Set Up Instructions
Click to view
- Download dependencies by running npm install
- Start up the app using npm start
Completion Instructions
Functionality to be added
The app must have the following functionalities
The App is provided with
bannerCardsList. It consists of a list of bannerCardItem objects with the following properties in each bannerCardItem objectKey Data Type id Number headerText String description String className String - The value of the key idshould be used as a key to theBannerCardItemcomponent.
- The value of the key classNameshould be used as a className for the HTML list item in theBannerCardItemcomponent.
Implementation Files
Use these files to complete the implementation:
- src/App.js
- src/App.css
- src/components/BannerCardItem/index.js
- src/components/BannerCardItem/index.css
Resources
Colors
Font-families
Things to Keep in Mind
- All components you implement should go in the
src/componentsdirectory.- Don't change the component folder names as those are the files being imported into the tests.
- Do not remove the pre-filled code
- Want to quickly review some of the concepts you’ve been learning? Take a look at the Cheat Sheets.
In this project, let's build Technology Cards by applying the concepts we have learned till now.
Refer to the image below:

Design Files
Click to view
Set Up Instructions
Click to view
- Download dependencies by running npm install
- Start up the app using npm start
Completion Instructions
Functionality to be added
The app must have the following functionalities
The App is provided with
cardsList. It consists of a list of cardItem objects with the following properties in each cardItem objectKey Data Type id Number title String description String imgUrl String className String - The value of the key idshould be used as a key to theCardItemcomponent.
- The value of the key classNameshould be used for the HTML list item in theCardItemcomponent.
Implementation Files
Use these files to complete the implementation:
- src/App.js
- src/App.css
- src/components/CardItem/index.js
- src/components/CardItem/index.css
Important Note
Click to view
The following instructions are required for the tests to pass
- Each CardItemshould have an HTML image element withaltattribute value as the value of the key title incardsList
Resources
Colors
Font-families
- Roboto
Things to Keep in Mind
- All components you implement should go in the
src/componentsdirectory.- Don't change the component folder names as those are the files being imported into the tests.
- Do not remove the pre-filled code
- Want to quickly review some of the concepts you’ve been learning? Take a look at the Cheat Sheets.
